
Question: How do I set up the AT-LP120XBT-USB turntable?
Answer: The AT-LP120XBT-USB is a fully manual direct-drive turntable that features the convenience of Bluetooth® wireless connectivity along with both analog and USB outputs.
It includes a lightweight headshell with preinstalled and aligned AT-VM95E cartridge. The turntable’s built-in phono preamp allows it to be used with a wide range of amplifiers and receivers.
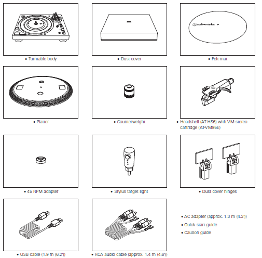
Before the turntable can be used, it needs to be set up. Carefully unpack the turntable and verify that you have all the parts and accessories:
- The turntable chassis
- Dust cover and hinges
- Platter assembly
- Felt mat
- Lightweight headshell with preinstalled
AT-VM95E cartridge
- Counterweight assembly
- 45 RPM record adapter
- Stylus cue light
- Dual RCA audio cable
- USB cable
- AC power adapter
Setting up the turntable
Position the turntable chassis on a sturdy surface. Install the platter and make certain it is fully seated. Place the felt mat on the platter.

Next, assemble the tonearm. Remove the twist tie and protective foam. Temporarily secure the tonearm to its rest with the locking clamp. Attach the headshell with preinstalled AT-VM95E cartridge by inserting it into the tonearm socket. While holding the headshell rotate the locking ring counterclockwise. As the ring rotates, it pulls the headshell into its seated position. Hand-tighten carefully, but do not overtighten.
![]()
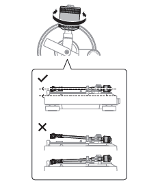
Install the counterweight, making certain the stylus force gauge dial is oriented toward the front. As you rotate the counterweight, it will thread onto the tonearm.

Now we will balance the tonearm, set the tracking force, and adjust the anti-skate for the AT-VM95E cartridge. This important process allows the cartridge to track properly, and failure to perform the process correctly can cause the stylus to wear prematurely and possibly damage your records. First, set the anti-skate adjustment knob to “0.” Remove the stylus’s protective cover. Slide it straight forward off the front of the cartridge, exposing the stylus. While gently holding the headshell to stabilize the tonearm, release the locking clamp. At this point, the tonearm is unbalanced and can easily swing. Be careful not to let the stylus drag across the platter. While gently holding the headshell, rotate the counterweight until the tonearm is horizontally balanced (floating). It should hover freely just above the platter and not touch the platter’s surface. Once the tonearm is balanced, without touching the counterweight, carefully move the tonearm to its rest and secure it with the locking clamp.
Now set the stylus tracking force. Every cartridge has a recommended tracking force. Setting the tracking force too light can cause the stylus to skip out of the groove on loud or dynamic passages. Setting it too heavy can cause excessive wear on the stylus and records, resulting in audio distortion or channel imbalance. For the AT-VM95E cartridge, the recommended tracking force is 2 grams. Locate the stylus force gauge dial on the front of the counterweight. Marked with numbers and lines indicating different tracking forces, the dial rotates independently from the counterweight. Without turning the counterweight, carefully rotate the gauge dial until the “0” on the dial lines up with the centerline mark on the top of the tonearm. Now set the tracking force by rotating the entire counterweight assembly in a counterclockwise direction. As you rotate the counterweight, note that the gauge dial rotates with it. Continue rotating the counterweight until the “2” value on the gauge dial lines up with the centerline mark on the tonearm. You now have set the recommended tracking force for the AT-VM95E cartridge.


Please note if you ever change out the cartridge and/or headshell, you will need to rebalance the tonearm and set the tracking force to the value required by the new cartridge.
The LP120XBT-USB has an anti-skate adjustment. This small outward force applied to the tonearm compensates for the natural skating force that pulls the tonearm toward the center of the record. For normal operation, set the anti-skate adjustment knob to the same value as the cartridge tracking force.

The turntable includes a stylus cue light. It illuminates the record surface to assist in finding the groove in a low-light situation. If needed, plug the cue light into the chassis receptacle and aim it as desired.

For best performance, the turntable should be level. Using a small bubble level, adjust the turntable’s feet as needed.

Connect the AC power adapter cable to the turntable and plug it in to a convenient AC outlet. Attach the dust cover by first placing the two hinges in the slots on back of the turntable and then sliding the dust cover onto the hinges.
Bluetooth connection
Along with analog audio and USB outputs, the LP120XBT-USB offers Bluetooth wireless connectivity. To use the turntable with another Bluetooth device, they must be “paired” or registered. Pairing allows devices using Bluetooth technology to recognize and communicate with one another. Once the pairing process is complete, the devices remain paired even if they are turned off. The LP120XBT-USB can be paired with up to eight compatible Bluetooth devices. However, it will only communicate with one other Bluetooth device at a time.
Before pairing the turntable, make certain the PHONO/LINE selector switch on the rear of the turntable is set to LINE.

Position the other Bluetooth receiver device (e.g., speakers or headphones) close to the turntable. This is to make certain the pairing process performs correctly. (Once paired, the devices can be separated by up to 30' line of sight.) Turn the turntable power switch on. The red power LED illuminates and the Bluetooth LED flashes blue, indicating that the Bluetooth transmitter is active and ready to pair.
Activate the pairing mode on the other Bluetooth device by following the instructions in that device’s user manual. Press and hold the turntable’s wireless function button for 2 seconds to begin the pairing process. The LED flashes blue/red, signifying the Bluetooth transmitter is in pairing mode. When the turntable successfully pairs, the LED turns solid blue.

The turntable now remains paired with the other device even if power is turned off. Most Bluetooth devices, including the turntable, will pair quickly. If the turntable does not “see” the other Bluetooth device after about 60 seconds, pairing mode automatically times out. If either device times out while trying to pair, simply put them back into pairing mode and repeat the pairing process. When the turntable is transmitting via Bluetooth, the Bluetooth receiving device is used to control volume and other audio-related functions.
Analog connection
In addition to the built-in Bluetooth transmitter, the LP120XBT-USB has a traditional PHONO output along with a built-in magnetic phono preamp providing an RIAA equalized line level output. This makes it compatible with traditional PHONO inputs on amplifiers and receivers, along with Aux or Line level inputs on powered speakers, amplifiers, and other audio equipment.
If your audio device has its own RIAA magnetic phono preamp, simply set the turntable’s PHONO/LINE selector switch to PHONO, bypassing the internal preamp.

To offer the best audio performance, the USB and Bluetooth outputs are completely removed from the signal path and will not function when the switch is set to PHONO.
If you are connecting to an “Aux” type line-level input or powered speakers, place the selector switch in the LINE position to use the turntable’s internal phono preamp.

If your audio device has a separate ground terminal, connect the spade lug on the dual RCA cable to the grounding lug on your audio component to help minimize hum.
USB connection
The turntable is also equipped with a USB output, allowing a digital connection to Macs and PCs without the need for special drivers. Compatible with a wide range of third-party recording packages, the USB connection allows you to record from the turntable to the computer. Simply connect the USB cable from the turntable to an open USB port on the computer. When using the USB output, make certain the PHONO/LINE selector is set to LINE. The turntable appears in the computer’s audio device list as “USB Audio Codec.”
If you have further questions, feel free to contact the Audio Solutions Department for assistance. Also, please view the video below for additional help with setting up the AT-LP120XBT-USB.