
Question: How do I install my VM Series phono cartridge?
Answer: The following steps will show you how to install a VM Series phono cartridge.
Become familiar with each part before using the product.
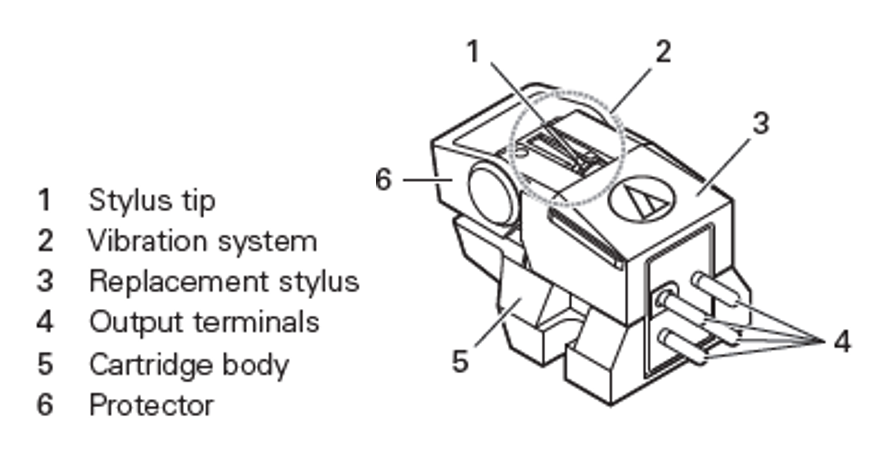
To avoid damaging the delicate vibration system (2), remove the stylus assembly (3) from the cartridge body (5) before installing the cartridge onto your turntable’s detachable headshell or tonearm with integrated headshell. Leave the flip-down stylus protector (6) in place while removing the assembly. Remove the assembly by grasping the sides of the cartridge body with one hand, then the sides of the assembly with the other. Slowly pull the assembly off the body using a slight rocking motion. See below.

Mounting the Cartridge
Two 5 mm slotted screws, two 10 mm slotted screws, two nylon washers and two nuts are provided for mounting the cartridge to a headshell. Choose the screw length that is appropriate for your particular headshell. For a thru-hole type headshell, insert the screws through the nylon washers, through the headshell, and through the cartridge body. Thread the nuts onto the screws. For a threaded type headshell, insert the screws through the cartridge and thread the screws into the headshell. See below. Only hand-tighten the screws at this time, the provided screwdriver will be used to snug the screws after final adjustments are made.

Wiring the Cartridge
Note that a headshell lead wire set is included with your VM Series cartridge. If you will be replacing your existing wire set, please do so at this time. Connect the four color-coded lead wires to the headshell, then to the cartridge, noting output polarity for the left (L) and right (R) channels. If the tips on the ends of the wires are too tight to push onto the output terminal pins (4) by hand, use a small tool – such as small needle-nose pliers or hemostat – to push the clips on instead. Carefully push from the backside of the clip until the clip seats firmly on the pin. Do not grasp the round barrel part of the clip which goes over the pin with the tool, as the round shape can become distorted from the pressure of the tool, making the clip more difficult to install.

Aligning the Cartridge
Reinstall the stylus assembly which was removed earlier. Align the tab on the inside of the assembly to the rectangular opening in the cartridge body and carefully press the assembly onto the body. It should seat firmly, making a slight “click” sound.

Determine the correct position for the cartridge (set stylus overhang). Adjust overhang following the instructions in the tonearm’s, turntable’s, or headshell’s user manual. If you are unsure what the overhang distance should be, align the stylus tip to the cartridge originally attached to the tonearm (as shown in the figure below). An overhang gauge or cartridge alignment protractor can be used to set overhang. While some gauges or protractors are provided as a separate accessory, included with either the turntable, tonearm or cartridge, others are simply printed (to actual size) in the user manual for these products. If none is provided, they are commercially available. It is important to obtain an overhang gauge or cartridge alignment protractor that is suitable for your particular turntable or tonearm. Once the cartridge is aligned, snug the slotted mounting screws with the provided screwdriver.

Adjust the Tracking Force
Confirm the tracking force (aka stylus pressure) range by referring to the vertical tracking force section of the product’s specifications. For all VM Series cartridges, apart from the VM670SP, this is 1.8 to 2.2 grams. The tracking force range for the VM670SP cartridge is 4.5 to 5.5 grams. Do not apply stylus pressure unnecessarily, too much pressure may not only damage the record and stylus but can also impair audio quality. Be certain to calibrate (balance and zero) your turntable’s tonearm according to the turntable’s or tonearm’s user manual prior to setting the tracking force. If you are unable to calibrate the tonearm for some reason, or you are not confident that you have done it correctly, you may set the force with the aid of a separate stylus force gauge.
Adjust the Tonearm Height
The correct vertical tracking angle (VTA) for the stylus assembly is achieved when the tonearm is parallel to the record surface as seen from the side while playing.

Vertical tracking angle is the angle the stylus cantilever makes with the record surface. When the correct VTA is obtained, the correct Stylus Rake Angle (SRA) is also obtained. Stylus Rake Angle is the angle the stylus tip makes with the record surface. When set correctly, the tip will sit at about a 92° angle to the record surface. This means that it is tilted back slightly against the direction of the record’s rotation. The tonearm assembly’s height should be such that the bottom surface of the headshell and the record are parallel to one another. If your turntable features a tonearm height adjustment, use this adjustment to raise or lower the rear of the tonearm as needed. If your height adjustment is calibrated, use the setting for a cartridge that is 17 mm tall. See an example of a turntable featuring adjustable tonearm height below (AT-LP7 turntable tonearm shown). If your tonearm’s height is not adjustable and the tonearm is low at the cartridge end of the arm, add a shim of appropriate thickness between the cartridge and headshell to raise the cartridge end of the arm until the arm is parallel to the record surface. Please note that in cases of extreme improper tonearm height, the body of the cartridge may contact the record surface, damaging the record and impairing audio quality.


Preamplifier/Amplifier Connections
All VM Series phono cartridges are moving magnet (MM) type magnetic cartridges. The turntable which the cartridge is mounted to should be connected to the PHONO input jacks on the associated equipment (stereo preamplifier, integrated amplifier, receiver, etc.), unless the turntable features a built-in phono preamplifier. If the turntable features a built-in phono preamplifier it may be used with PHONO inputs, in which case the built-in preamplifier should be turned off, or with any input other than a phono input, such as the AUX or CD input, in which case the built-in preamplifier should be turned on. On Audio-Technica branded turntables, the preamplifier is off when the preamp selector switch located on the back of the turntable is set to the PHONO position and on when the switch is set to the LINE position. Note that some of our turntables, such as the AT-LP140XP model, do NOT feature a built-in phono preamplifier.
Care
Use the included brush to remove dirt and dust from the stylus tip. Brush in a back to front direction only (the direction in which the record rotates). A stylus cleaner, such as our AT607a Stylus Cleaner, is recommended for removing stubborn dirt.
Replacing the Stylus
Stylus life expectancy varies according to stylus profile type and the frequency of record and stylus care. Following is the approximate life expectancy by stylus profile type.
Conical – 300 to 500 hours
Elliptical – 300 hours
Micro linear – 1000 hours
Shibata and Special Line Contact – 800 hours
If you have additional questions about VM Series cartridge installation, please feel free to contact the Audio Solutions Department for further assistance.