
Setting up your CREATOR PACK
Audio-Technica's creator pack has everything needed to get up and running as a content creator, podcaster or streamer. Follow these simple instructions to get your ATR2500x-USB and ATH-M20X set up so you can start creating.
Mac OS
Initial Setup
Connect the ATR2500x-USB microphone to an open USB port on the Mac (Type A or Type C). Open the system preferences by clicking the Apple logo in the upper left corner of the menu bar and selecting System Preferences. Alternatively, you can click on the gear icon in the dock. Click the Loudspeaker icon to open the sound preferences.

By default the Mac selects the internal microphone as the sound input device. When the ATR2500x-USB is plugged in, the Mac assumes that it is the desired input device and automatically selects it.Verify that the ATR2500x-USB is highlighted.
The input volume for the microphone can be adjusted by moving the input slider and watching the level meter while speaking into the microphone. Setting the level too low will not provide enough input signal to your recording application. Setting it too high can overload the input to the recording application resulting in clipping or distortion.
Note: The output volume slider controls the Mac’s speaker or headphone jack output and does not affect the input sound level. This slider replicates the volume control associated with the small speaker icon in the menu bar and the volume controls on the keyboard.

Because the ATR2500x-USB Microphone has a built-in headphone output, the Mac selects it as the output device. Should you desire to use the internal speakers for playback audio, click the Output tab and choose the desired output device.
The balance control sets the left to right balance in the output device.
The Output volume controls the playback level from the Mac. It is the same as clicking on the small speaker icon in the menu bar and adjusting volume or using the keyboard controls.

Setting application access
In order to use the ATR2500x-USB microphone with certain applications you need to verify that the apps are enabled to have access to the microphone. Open the system preferences and click on the Security and Privacy icon.

To make changes, you will need to unlock the padlock on the Security and Privacy window by entering your user name and password.Scroll down to make certain the apps you want to use the microphone with are enabled. If not, use the switch slider associated with the App to turn it on.

Click the microphone icon and verify that a check mark appears next to the applications that need access to the microphone. Make certain to click the lock to lock it after making the changes.

Advanced Sound Settings
At this point the Mac is set up to use the ATR2500x-USB microphone as the input device and your selection as the output device. The sample rate is set for the default value (44.1 KHz CD Quality). However, additional settings are available that enable you to change the audio sampling rate and individually adjust left and right input signal levels if you desire.To access these settings, open a new finder window and navigate to “Applications—Utilities” and double-click the Audio MIDI Setup application.

A list of audio devices appears on the left side and the adjustable settings for the selected device appear on the right.The ATR2500x-USB appears as two separate devices. One is an input device (2 ins / 0 outs) while the other represents its output (0 ins / 2 outs).Clicking the input device (2 ins / 0 outs) shows the current settings.
The Format section contains the sample rate settings. The Master Stream section allows you to individually adjust the microphone signal levels for the left and right audio inputs.

The ATR2500x-USB is capable of very high-quality recording and supports sample rates of up to 192 KHz. In some situations higher sample rates can provide better results. However, as the sample rate increases, the file size becomes much larger.If you are recording voice-overs for video or music that will be synchronized with video, the default sample rate needs to be changed from 44.1 KHz to 48 KHz. To change the sample rate, click the drop-down arrows next to the Format box. A sub window opens listing available sample rates. Click on the desired one to choose it and close the sub-window.
Remember that the selected sample rate must match the value set in your recording application or you will hear pops and clicks in the recorded audio.

PC Windows
Initial Setup
The first time you plug the microphone in, you may see a message that new hardware has been found, or you may see a driver software installed notice. After the first time, you will not see any of these as the computer has already installed the necessary drivers for a USB microphone.
When the ATR2500x-USB microphone is connected, Windows 10 will automatically select it as the input and output device.
To verify or make changes click the Start window and click settings (the gear).

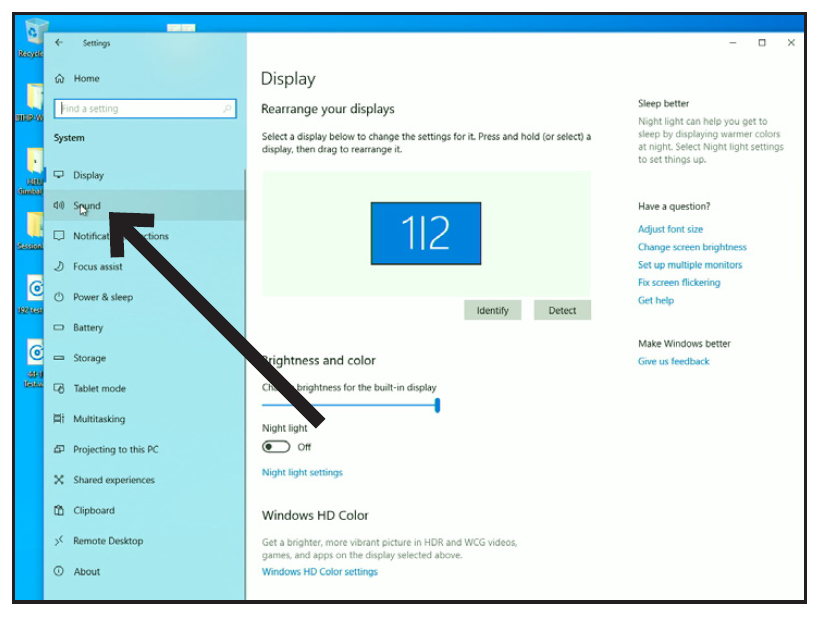
When the settings window opens, Click “System.”

When the System window opens, in the left column, click “Sound.”
The Sound tab opens showing the active input and output device which should be the USB microphone.
To use the computer speakers as your output device, click “Choose your output device” and in the drop-down menu choose the desired item.

At this point, your computer is set up to use the ATR2500x-USB microphone as the audio input device and whatever you chose as the audio output device.
Setting application access
Windows has some additional privacy settings, allowing users to control which apps and programs have access to the microphone. In order to use the ATR2500x-USB microphone with certain applications you need to verify that the apps are enabled to have access to the microphone.
In the main Sound setup window, click the “Microphone privacy settings.”

The Privacy settings window for the microphone opens. Verify that the “Allow apps to access your microphone” switch is set to “On.”

Scroll down to make certain the apps you want to use the microphone with are enabled. If not use the switch slider associated with the app to turn it on.

Scroll down to the section ”Allow desktop apps to access your microphone” and verify that the switch is turned on. This allows applications such as Audacity to have access to the microphone (or other chosen audio source).

Advanced Sound Settings
At this point Windows is set up to use the ATR2500x-USB microphone as the input and output device. The sample rate is set for the Windows default (44.1 KHz CD Quality). However, additional settings are available, including input level and sampling rate.
To access these settings, click “Sound Control Panel.”

When the Sound Control Panel opens, select the “Recording” tab and select the ATR2500x-USB microphone.
Click “Properties.”
Click the Levels tab and move the slider to the right or left to set the input gain for the microphone. Setting it too low will not provide enough signal to your recording application. Setting it too high can cause the recording application to distort.
Note that this level setting is different from the volume control slider on the main sound settings window.

The ATR2500x-USB is capable of very high-quality recording and supports sample rates of up to 192 KHz. In some situations higher sample rates can provide better results. However, as the sample rate increases, the file size becomes much larger.
If you are recording voice-overs for video or music that will be synchronized with video, the default sample rate needs to be changed from 44.1 KHz to 48 KHz.
To change the sample rate, click the Advanced tab. The default sample rate (44100 Hz CD Quality) is shown in the drop-down box. Click the drop-down and choose the desired sample rate.

Leaving the “Exclusive Mode” boxes checked allows the recording application to take control of the microphone. This will set the sample rate correctly based on the recording project settings.
When the sample rate is changed, a “Device in use” warning dialog box appears letting you know that a change has been made that may affect other applications (non-exclusive) that might be using the microphone.
Click “Yes” to continue and use the new sample rate.
